Integration Testing with React and Enzyme
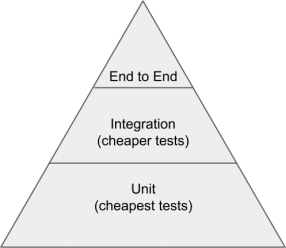
When coding an application, it is essential to have tests as part of the code base. Martin Fowler proposed a metaphor that tells us the different types of tests and how many of each we should have in a project. It’s called the testing pyramid:
We were recently tasked with creating an integration testing framework for a React application we maintain. We had a few requirements for our integration tests.
The tests should:
- Be quick to run.
- Be easy to implement.
- Have the ability to cover the entire React app without relying on a server.
Our first action was a short spike into the best tools to use, and inspired by a great blog post titled React integration testing with Enzyme, we settled on Enzyme. Enzyme is a Javascript testing utility for React that can render React components into a virtual DOM. We can then interact with the DOM and assert that our rendered components are working as expected. Typically, Enzyme is used for unit testing by shallow rendering a single component in isolation, but it also allows us to fully render components, including all nested components, with the mount function. Since everything in React is a component, there is nothing stopping us from mounting the top level component and rendering the entire application in memory. We can then use the Enzyme API to interact with our app in any way we wish.
Implementation
Let’s imagine a simplified version of the shipping label printing flow on eBay. Our app will have two pages. On page 1, we will load two possible carrier services from the server and display them to the user. The user will select the carrier they want their package to be delivered with, enter the destination address, and click submit. This will fire off a request to the server containing the user’s input details. We will then return a link to a shipping label and display it in a new page (page 2). The user can then open the shipping label, print it, and stick it on their package.
Mocking the Server
In order to isolate the React application, we need to mock the requests and responses from the server. Using the fetch-mock library, we were able to set our mocks as follows.
import fetchMock from 'fetch-mock'

class MockApi {
  mockGetCarriers () {
    fetchMock.get('/', carrierResponse)
  }

  mockSubmitDetails () {
    fetchMock.post('/label', labelResponse)
  }
}

export const mockApi = new MockApi()

const labelResponse = {
  labelUrl: 'www.example.com/123456789'
}
const carrierResponse = {
  carrier: [
    {
      name: 'Carrier 1',
      rating: '5/10'
    },
    {
      name: 'Carrier 2',
      rating: '7/10'
    }
  ]
}
Before each test in our integration test, we are setting up our mock calls to the server.
beforeEach(() => {
  mockApi.mockGetCarriers()
})
Our app can do two possible requests. One to get the carriers when the app loads, and one to submit the user’s details and get a label link. The beforeEach block should be responsible for every call that is required to get the app into the first usable state. In our case, that’s the get carriers request. Any other mock calls that might be needed from there (our submit details request) should go into the individual test. The reason for this being that not all tests need the submit details request (integration tests on just the details page for example), so the call should not be set up if it is not required.
After each test, we want a clean environment. This means cleaning up any mocked server requests.
afterEach(async() => {
  fetchMock.restore()
})
Setup
For context, here is what the final integration test will look like:
integrationTest('should be able to click through app and get a link to a label', async (app) => {
  mockApi.mockSubmitDetails()

  const detailsPage = await app.detailsPage()
  expect(detailsPage.getListOfCarriers().length).toEqual(2)
  detailsPage.selectFirstCarrier()
  detailsPage.enterDestinationAddress()
  detailsPage.clickSubmitButton()

  const labelPage = await app.labelPage()
  expect(labelPage.getLabelLink().prop('href'))
    .toEqual('www.example.com/123456789')
})
In order to make the test understandable at a quick glance, we abstracted the test logic into three layers: Layer 1 is the integration test shown above, layer 2 is the main setup for the test, and layer 3 is the direct interaction with the Enzyme API. Let’s first look at layer 2, integrationTest.js.
const asyncFlush = () => new Promise(resolve => setTimeout(resolve, 0))
const MAX_FLUSHES_TO_WAIT_FOR = 10 // maximum number of callbacks to wait for chain to complete
export async function successFrom (checkerFunction) {
  let flushCount = 0
  while (!checkerFunction()) {
    await asyncFlush()
    if (flushCount++ > MAX_FLUSHES_TO_WAIT_FOR) {
      throw new Error('Timeout awaiting async code')
    }
  }
}

export class TestHelper {
  constructor () {
    const dom = document.createElement('div')
    const screen = mount(<App />, {attachTo: dom})
    this.updatedScreen = () => screen.update()
  }

  async detailsPage () {
    const detailsPageHelper = new DetailsPageHelper(this.updatedScreen())
    await successFrom(() => detailsPageHelper.getListOfCarriers().length > 0)
    return detailsPageHelper
  }

  async labelPage () {
    const labelPageHelper = new LabelPageHelper(this.updatedScreen())
    await successFrom(() => labelPageHelper.getLabelLink().length > 0)
    return labelPageHelper
  }
}

export default function integrationTest (name, callback) {
  test(name, () => {
    const app = new TestHelper()
    return callback(app)
  })
}
There is a lot going on here so let’s step through it. The entry point of this file is the exported integrationTest function on line 33 above. This will create a TestHelper Object. On creation of this object, our app is mounted with Enzyme and associated with the object instance. One thing we noticed is that the Enzyme DOM was not always representing the most recent DOM state. This is due to updates that are not a direct result of an Enzyme interaction, such as a Redux store update from a server response. As a solution, whenever we need to access the DOM, we always return an updated version as shown on line 17:
export class TestHelper {
  constructor () {
    const dom = document.createElement('div')
    const screen = mount(<App />, {attachTo: dom})
    this.updatedScreen = () => screen.update()
  }
This is not a very expensive operation and it provides a guarantee that we are always testing the most up-to-date DOM state. In addition to mounting the app, our TestHelper class also provides access to our page test helpers. I will touch on these in a bit.
An important hurdle we encountered was waiting for our app to get into a state that can be tested. In the case of our simple label app, we need to wait for the carriers to be loaded and rendered before we can begin our test. Assuming our server request to get the carriers is asynchronous, the way we solved this problem was by introducing a successFrom function shown on line 3:
export async function successFrom (checkerFunction) {
  let flushCount = 0
  while (!checkerFunction()) {
    await asyncFlush()
    if (flushCount++ > MAX_FLUSHES_TO_WAIT_FOR) {
      throw new Error('Timeout awaiting async code')
    }
  }
}
The asyncFlush function:
export const asyncFlush = () => new Promise(resolve => setTimeout(resolve, 0))
The premise is that we can load the app, fire off the initial requests, and wait for a certain condition on our first page to be fulfilled. The condition for the details page is that the carriers list contains more than 0 carriers, shown on line 22, and the condition for the label page is that the label link is present, shown on line 28:
  async detailsPage () {
    const detailsPageHelper = new DetailsPageHelper(this.updatedScreen())
    await successFrom(() => detailsPageHelper.getListOfCarriers().length > 0)
    return detailsPageHelper
  }

  async labelPage () {
    const labelPageHelper = new LabelPageHelper(this.updatedScreen())
    await successFrom(() => labelPageHelper.getLabelLink().length > 0)
    return labelPageHelper
  }
}
The successFrom function works by continually adding and resolving functions on the Javascript message queue. When this returns, we know that the event loop has been run in its entirety a single time. This will hopefully mean that we have resolved the promise from the mocked fetch request to the server. If not, we will continue to flush until the callback passed in returns true or we reach our max flush count and fail.
Let’s now look at layer 3. So far, I have shown how our integration test mounts our application and waits for it to get into a state that is ready to be tested. From here we can start performing actions on our application using the Enzyme API. We set this up using page helpers. The page helper simply translates a high-level action to Enzyme API interactions, keeping our tests describing behavior and free from the implementation details of the app under test. Below shows our DetailsPageHelper.js.
export class DetailsPageHelper {
  constructor (screen) {
    this.updatedScreen = () => screen.update()
  }

  getListOfCarriers () {
    return this.updatedScreen().find('#carrierCheckbox')
  }

  selectFirstCarrier () {
    this.getListOfCarriers().at(0).simulate('change', { target: { checked: true } })
  }

  enterDestinationAddress () {
     this.updatedScreen().find('#destinationAddressInput').simulate('change', { target: { value: '123 Address Road' } })
  }

  clickSubmitButton () {
    this.updatedScreen().find('#submit').simulate('click')
  }
}
Integration Test
We now know all the required information to run through the integration test:
integrationTest('should be able to click through app and get a link to a label', async (app) => {
  mockApi.mockSubmitDetails()

  const detailsPage = await app.detailsPage()
  expect(detailsPage.getListOfCarriers().length).toEqual(2)
  detailsPage.selectFirstCarrier()
  detailsPage.enterDestinationAddress()
  detailsPage.clickSubmitButton()

  const labelPage = await app.labelPage()
  expect(labelPage.getLabelLink().prop('href'))
    .toEqual('www.example.com/123456789')
})
We first set up any extra mock calls required for the test. In this case, it is mocking the submit details call. We then wait for the page to load, shown on line 4. Interactions are then carried out on line 6, 7, and 8, and we then wait for the next page (the labels page) to be ready. The reason we need to wait here again is because our submit action on the details page is sending an asynchronous request to the server and waiting for a response. If we did not wait here, the test would immediately attempt to retrieve the label link before the server has responded. If there was no server request between the two pages, we could continue the test without waiting for a success condition. We then make a final assertion on line 11 to ensure we have a label link.
Conclusion
These are the basics needed to build integration tests that cover an entire React application using Enzyme. There are limitations that need to be kept in mind with the proposed format, one being the way the mock API is set up. All the responses are in a single file. If we added a second test, the server responses would be the same as the first test. If we required a different response for each test, we would need to think about a scalable way to manage all the response data, and how to connect the appropriate responses to the appropriate tests. Writing out the responses in a complex application can also be quite tedious. Another limitation is the page helper structure. Most of the React apps we work on are 2-4 pages. For an app with a significant number of pages, the structure presented above might not be feasible.
After some time using this approach to integration testing, we are happy with the way it has turned out. Overall, the benefit of getting a high level of confidence that our components work together in such a short period of time far outweigh any drawbacks in this approach. We plan on rolling it out to more of our React apps to see how it works under different scenarios.